Oblivion:Random Oblivion World 3
| Oblivion World: Random Oblivion World 3 |
|
|---|---|
| # of Peripheral Towers | 4 |
| # of Non-Random Caves | 1 |
| Console Location Code | |
| Worldspace: OblivionRD003 OblivionRD003CavesA OblivionRD003Tower01Left OblivionRD003Tower01Right OblivionRD003Tower02Left OblivionRD003Tower02Right |
|
| Fixed Gate | |
| Gate outside Leyawiin | |
Random Oblivion World 3 is a large-sized Oblivion World, and one of seven randomly chosen Worlds.
The Oblivion Gate in front of Leyawiin always connects to this world.
Contents
Exterior[edit]
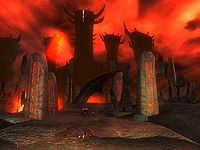
Upon entering from the Oblivion Gate at OG, you will find yourself on a small island with the main tower straight ahead beyond a broken stone bridge. Just in front of you is a dead horse, while a dead scamp lies sprawled on the broken bridge, and two Daedric enemies lurk nearby. Head a short way northwest until you reach door A to the Nether Tunnels, avoiding another enemy and three land mine traps (m) along the way.
Once you exit from the caves, you will emerge from door B at the foot of the hill hosting the main tower and across the lava from the broken bridge. From here you can choose to head either west or east. Heading west and continuing along the coastal path leads you past the entrance (C) to the western Spindle Shrine tower and eventually to an area with three Fleshy Pods. Along the way you'll need to negotiate three enemies and four Fire Turret traps (f). The eastern path similarly leads you past the entrance (E) to the eastern Spindle Shrine tower and eventually to a walled area with three enemies and four Fleshy Pods. Along the way you will also encounter three more enemies and three Fire Turret traps (f).
To reach the main tower, you can enter either of the Spindle Shrine towers and then use the walkways to reach their corresponding Blood Well tower. On the highest level of each of these you will find a lever which opens the two War Gates at G, allowing you to enter the Tower Portal (a randomly selected Sigil Keep from one of the 5 possible presets) via door M. The two sets of towers have only marginal differences in terms of occupants.
An alternative route you can take is to head up the hill due north from either of the two Spindle Shrine entrances. Both paths converge eventually and you will make your way up the hill via a few turnpikes. After battling past two enemies you will reach an intersection while at the base of the eastern Blood Well tower. Just to the north is the entrance (L) to The Molten Halls, a small cave which provides access to the lowest levels of both Spindle Shrine towers. Otherwise heading west takes you to the War Gate at G.
Occupants:
Treasure:
Plants:
- Plants are marked by yellow dots on map
- 109 Blood Grass plants
- 16 Harrada plants
- 17 Spiddal Stick plants
- 5 Blood Grass plants and 1 Spiddal Stick plant are in inaccessible locations
Traps:
- 11 Fire Turret traps at f
- 3 Land Mine traps at m
Doors and Gates:
- There are thirteen doors in/out of this zone
- 1 Oblivion Gate (at OG) leads to Tamriel
- 2 doors (at A and B) lead to the zone Nether Tunnels (Z1)
- 2 doors (at C and D) lead to the zone Spindle Shrine (West) (Z3)
- 2 doors (at E and F) lead to the zone Spindle Shrine (East) (Z4)
- 2 doors (at H and I) lead to the zone Blood Well (West) (Z5)
- 2 doors (at J and K) lead to the zone Blood Well (East) (Z6)
- 1 door (at L) leads to the zone The Molten Halls (Z2)
- 1 door (at M) leads to the zone Tower Portal (Z7)
- Note that two sets of doors (C and D; and E and F) are located directly above each other and thus appear as a single door on the map.
- 2 War Gates at G
Nether Tunnels[edit]
This zone is entered via door A and exited via door B. It consists of 2-3 random Oblivion Caves, selected from the 21 possible presets.
The Molten Halls[edit]
After entering from door L you will immediately find four Fleshy Pods in a small room. After dispatching two enemies, you will arrive at an intersection. Heading northeast will bring you to door D, which leads to the lower level of the western Spindle Shrine tower. At the end of the northwestern corridor instead is a room hosting another Fleshy Pod and door E, which leads to the lower level of the eastern Spindle Shrine tower. Along the way you may encounter up to two more enemies.
Occupants:
Treasure:
Doors and Gates:
- There are three doors in/out of this zone
- 1 door (at L) leads outside
- 1 door (at D) leads to the zone Spindle Shrine (East) (Z4)
- 1 door (at E) leads to the zone Spindle Shrine (West) (Z3)
Spindle Shrine (West)[edit]
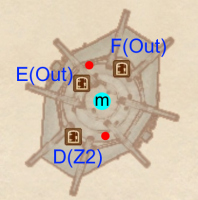
Entering from door C you will find the Corpse Masher lift stuck and will need to make your way up the tower past numerous hanging corpses. At the top you will find an enemy guarding a Magicka Essence (m) and door D, which leads to a walkway connecting this tower to the western Blood Well.
If entering from The Molten Halls via door E, you will instead be on the lowest level. Here you will find two enemies and can use the nearby lever to call the lift.
Occupants:
Doors and Gates:
- There are three doors in/out of this zone
- 1 door (at C) leads outside
- 1 door (at D) leads outside to a bridge leading to the zone Blood Well (West) (Z5)
- 1 door (at E) leads to the zone The Molten Halls (Z2)
Other:
- 1 Magicka Essence at m
Spindle Shrine (East)[edit]
Similarly to the western tower, the lift won't be working when entering from door E and you will need to make your way to the top of the tower. Here again you will find an enemy guarding a Magicka Essence (m) and door F, which leads to a walkway connecting this tower to the eastern Blood Well.
When entering from The Molten Halls via door D, you will again be on the lowest level, with another enemy and a lever to call the lift.
Occupants:
Doors and Gates:
- There are three doors in/out of this zone
- 1 door (at D) leads to the zone The Molten Halls (Z2)
- 1 door (at E) leads outside
- 1 door (at F) leads outside to a bridge leading to the zone Blood Well (East) (Z6)
Other:
- 1 Magicka Essence at m
Blood Well (West)[edit]
You will enter via door H from the walkway connecting to the western Spindle Shrine tower and find yourself in the middle of this tower. You can use the Corpse Masher lift to access the lower section, which hosts an enemy and a The Punished container. On the highest level are a Blood Fountain (b) and the Gate Control lever (G) to open the War Gates just outside from door I.
Occupants:
Treasure:
Doors and Gates:
- There are two doors in/out of this zone
- 1 door (at H) leads outside to a bridge leading to the zone Spindle Shrine (West) (Z3)
- 1 door (at I) leads outside
Other:
- 1 Blood Fountain at b
- 1 Gate Control at location G on map, highest level (opens the War Gates outside at G)
Blood Well (East)[edit]
As with the western tower, you enter from door J to find yourself on the middle level, and the Corpse Masher lift will grant you access to a lower section with an enemy and a The Punished container. Unlike the western tower, the highest level hosts a Brood Cage (C) with a dead Mythic Dawn Guard (D) inside. The Cage Master lever nearby (M) opens the cage, which causes the dead guard to eventually impale on the lift's central spike. Also nearby is the Gate Control lever (G) to open the War Gates just outside from door K.
Occupants:
- 1 Daedric occupants (Daedra or Dremora)
- 1 Mythic Dawn Guard (dead) at D
Treasure:
Doors and Gates:
- There are two doors in/out of this zone
- 1 door (at J) leads outside to a bridge leading to the zone Spindle Shrine (East) (Z4)
- 1 door (at K) leads outside
Other:
- 1 Brood Cage at C
- 1 The Cage Master lever at M, highest level (operates the Brood Cage)
- 1 Gate Control at G, highest level (opens the War Gates outside at G)
Tower Portal[edit]
This world's Sigil Keep is entered from door M and is a randomly selected tower from one of the 5 possible presets.


