Redguard:A Legendary Flask
|
Quick Walkthrough[edit]
The bold letters in parentheses indicate which item these steps lead you to: (M) = Maiko's map, (T) = Trithik's map piece, and (S) = silver boat.
- (Optional) Buy the book Elven Artifacts vIII at J'ffer's Books. (M)
- (Optional) Talk to Maiko in the Cartographer's and have him make you a map from the Elven Artifacts book you bought. (M)
- Ask Falicia in the Mage's Guild about the soul gem. Jaganvir turns you into a gremlin. To complete the optional steps labeled (S), first ask her about the Flask of Lillandril and its map.
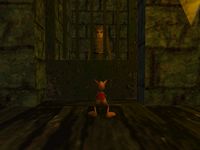
- Enter the Jail via the small window to the right of the door.
- Use gremlin language to say "change me back" to Joto. He gives you a map piece.
- Fight Dram when he appears and escape the Jail and Old Quarter.
- (Optional) Ask Dreekius about the flask to learn that Crendal has a map piece. (T)
- (Optional) Tell Trithik about the map piece then trick Crendal into checking his hiding spot. Dig up the map piece. (T)
- (Optional) Kill the two guards ransacking Krisandra's dwelling and report this to Krisandra in the Silversmith's. (S)
- (Optional) Receive a key to her storeroom and pick up the silver boat inside. (S)
- (Optional) Return to Maiko and pick up the map he made. (M)
- Dig up the flask near Saintsport, possibly using the maps you found in the process as well as the League insignia.
Detailed Walkthrough[edit]
Similar to the previous quest, parts of this quest can be completed without doing the prerequisite quest. This quest is unusual in that many of its steps are optional; all of these can be completed before Contact the League: Maiko's Map, Trithik's Map Piece, and The Silver Boat. They can also be done in any order so long as you have either left the Jail already, read the book Elven Artifacts vIII from a bookshelf in J'ffer's Books, or bought it from J'ffer.
- Maiko's Map
- To begin, you need to buy the book Elven Artifacts vIII at J'ffer's Books if you haven't done so already. It costs 40 gold. Bring the book to the Cartographer's and talk to Maiko. Ask to buy maps and then mention the Elven Artifacts book. Maiko says he can make a map using the notations in the book, but he wants the book in return. You have the option to barter, but gold will not convince him. He finishes the map after about 40 real-time minutes, which is why it's a good idea to do this part first.
- Mage's Guild
- With the knowledge that Iszara fled the League hideout with the soul gem, you should visit the Mage's Guild and talk to the Apprentice, Falicia. If you wish to find the Silver Boat later, now is a good time to ask her about the Flask of Lillandril, an artifact that absorbs magic described in the Elven Artifacts book.
- When you are finished, ask her about soul gems. She will be hesitant to reveal more information, but either option you choose to persuade her will work. This starts the scene Falicia's Confession. She begins to explain how Iszara came to the guildhall with the gem and an Acolyte named Joto helped Iszara research how to restore Prince A'tor from it. Then Dram came and threw Joto in the Jail. Before she can finish, Archmage Jaganvir comes out of his study and tries to silence the conversation. To keep Cyrus quiet, he uses a spell to transform him into a gremlin.
- As a gremlin, you cannot enter any building except the Jail. You may want to roam around and talk to people because each person outside has their own set of unique dialogue in response to your new form. Also, make sure to avoid water because it will kill you instantly. In gremlin form, you have these options in dialogue:
- Help!: "Laloo!"
- Please!: "Mee!"
- Iszara!: "Bak!"
- Joto!: "Chaa!"
- Jail!: "Weee!"
- Magic!: "Eng!"
- Each time you choose an option, it stacks with previous options until the fifth time, when it resets. You can also exit dialogue to reset the stack. If you want to talk to various people first, you should speak the combination "Chaa! Eng! Mee! Bak!" to unlock the topic "Joto Magic Please Iszara!" This allows you to use that combination automatically from then on.
- Joto
- Head over to the Jail, east of the Palace's bridge. To get in, jump onto the ledge to the right of the door and jump again in through the window. The room you find yourself in is very dark but look for a half-opened door. Waddle up the left-hand stairs and through the corridor forward and slightly on your left. Turn right around the corner and you'll find Joto in his cell. Talk to the Khajiit and use the combination "Joto Magic Please Iszara!" to make him recognize you as human and cast a spell to change you back, starting the scene Joto's Story.
- When you become Cyrus once again, Joto realizes you are Iszara's brother and explains how he and Iszara planned to visit N'Gasta because he had knowledge of soul gems. Joto knew N'Gasta was cunning, so he decided to seek out the fabled Flask of Lillandril. They could use this to defend against the necromancer's attacks, should he turn hostile. They found a piece of the map showing the flask's location, but Iszara went to N'Gasta before they found anything else.
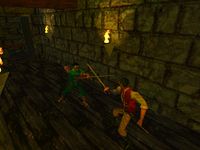
- Joto hands you the map piece, which he managed to keep from the guards. Suddenly, Dram appears behind you and kills Joto with his bow. You regain control of Cyrus and now must either defeat Dram in combat or flee from him. He is a skilled swordsman and his attacks deal 20 damage. After four successful strikes with your sabre, he uses a spell to retreat. Watch out for the veteran guard in the Jail, who is now hostile. You can find three health potions in a closet in front of you as you leave the cell corridor. There are three more up the stairs on the left. However, to exit the Jail you must take the stairs on your right.
- Old Quarter
- It will be night when you exit the Jail. You end up on the walls of the Old Quarter, above the closed gate connecting it to the rest of the city. Two veteran guards are on top of this section of the wall. Continue along the wall until you reach its opposite end, where the roof of a building is close by. Another veteran guard can be found up there, standing by a brazier. Jump over to this building and fight him, grab a health potion behind the chimney, then climb onto the higher roof section on your left. Jump over the rooftops heading north, until you reach an infantry and elite guard. They stand next to another brazier with a health potion beside it.
- Jump over the northern gap to the next building. An infantry guard patrols a short incline leading up to the roof, though you still need to climb up. Fall down to a lower roof section on the other side. Start jumping east along the rooftops over to a veteran guard who stands by a health potion. Continue along until you reach the building with the small incline, heading back south. You can optionally climb to the roof and grab a health potion behind the chimney. The gap here is too far, but there is a cloth awning attached beneath the ledge that you can bounce on to extend your jump. The roof you land on boasts two infantry guards and an elite guard gathered around a brazier.
- Two awnings are attached to the west ledge of this roof, allowing you to reach the next building where an infantry guard awaits you. Climb onto the higher roof section then down again to a room missing most of its walls and ceiling that's occupied by two veteran guards. There is a health potion and gold pouch by the brazier. The next jump south seems to be too far, but you can make it just barely and hang from the ledge. Be careful as this roof collapses in on itself, opening a deadly drop. The next roof is occupied by two more veteran guards by another brazier. Cross over the higher roof section and jump down to the city walls, which begin again at this point. You inevitably take some 10 fall damage. A final elite guard patrols this wall.
- There are a few ways of getting to the ground. The only way that avoids fall damage is to walk around the short tower ahead of you and drop from the roof of the Jail to the steps below. A more interesting way is to drop from the walls into the Old Quarter, which is intended to be inaccessible except during this quest. There are more items to be found within, along with even more guards. Finally, at the small tower you can jump to the wall extending south. From here, you can jump over to the building by Lakene or make your way down the receding wall.
- Trithik's Map Piece
- To find another map piece, go to the Draggin Tale and ask Dreekius about the flask. He explains that a local drunk named Crendal was boasting about having a piece of the map. Crendal can be found wandering outside the tavern. You may talk to him now to learn that he "found" the map piece on Trithik's boat and hid it somewhere, but you cannot trick him into revealing the location yet. Trithik walks between the docks and Silversmith's, west of the Draggin Tale. Tell him that Crendal stole his map piece, and he will describe it for you and say it's yours if you find it.
- You can now trick Crendal into checking on his hiding spot. Cyrus explains that he heard some boys found the map; when Crendal is unconvinced, he describes it as Trithik did. Crendal pretends that the information is untrue and immediately starts walking over to the park by Gerrick's Goods. He stoops down to check the ground then returns to the tavern. You do not actually have to wait for him to check his hiding spot, but you do need a shovel. If you don't have one, the general store is conveniently nearby. Dig by the tree in the southwest corner to uncover a leather pouch containing Trithik's map piece.
- The Silver Boat
- If you did not ask Falicia about the flask and its map earlier, do so now. She's heard rumors that part of the map was inscribed on a silver boat. Instead of going to the Silversmith's, check inside Krisandra's dwelling to the south. Two veteran guards can be found searching the dwelling, and they attack on sight. Once they are dealt with, go to the Silversmith's now and report the incident to Krisandra, the silversmith. She doesn't know anything about a silver boat, but gives you a key to her storeroom if you mention the flask map. The door to her storeroom is on the back side of her dwelling. There are two chests inside; the closer one is empty, and the other contains the silver boat.
- Unearthing the Flask
- The only map piece that you actually have to obtain is Joto's. Whether you want to find the others is up to you. If you had Maiko start making the map at the beginning of the quest, it should be ready to be picked up now. Interestingly, the League insignia that you got at the Smuggler's Den has a small piece of the map on its back too. When all of the pieces are put together, the map looks like this:
Maiko's map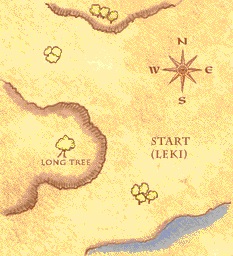 |
Four combined map pieces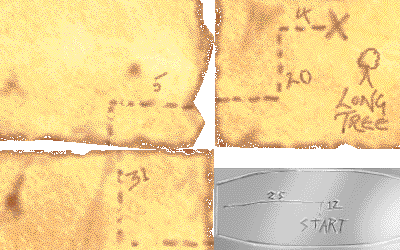 |
- The combined maps by default are rotated 90 degrees clockwise, so that up is west. Adding up the number of paces west and south, you should count 63 going west and 16 going south. The starting point, as indicating by Maiko's map, is "Leki". This refers to the wayshrine in the center of Saintsport with a painting of Leki on its ceiling. Her hand is pointing west.
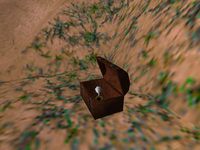
- The "long tree" is long gone: there are no trees near the flask's location. To find the flask's burial ground, walk west from Saintsport and take a left as you pass the wall into the patches of grass. It's buried in a very square-shaped corner of this area. Dig and the chest containing the flask will be revealed. Cyrus exclaims, "Magnificent!" and then "What's this?" when you approach the flask.
- Once you have the flask, you are prepared to confront N'Gasta about Iszara's disappearance. As Joto said, her last known intentions were to visit the necromancer at his tower.
Scenes[edit]
Falicia's Confession[edit]
This scene is a continuation of Falicia's "Soulgem" topic.
- Falicia: "I'm sorry I didn't tell you before, but Archmage Jaganvir is worried that the Empire will shut the guild down if we are caught helping the Crowns."
- Cyrus: "I'm not a Crown. Iszara is my sister."
- Falicia: "Fine. Your sister came here with the soulgem. She was frantic and insistent on speaking to one of the upper cabal.
-
- "She was worried about being followed and needed to restore Prince A'tor as soon as possible."
-
- Cyrus: "She was going to bring back the Prince?"
- Falicia: "What do you think the soulgem was for in the first place, a keepsake of her lost love?
-
- "Look, Archmage Voa put A'tor's soul into the gem to save him from the Empire, see?
- "Somehow the Restless League got their hands on it and were using it to rally supporters to win the kingdom back.
- "Anyway, Iszara got tired of waiting around for this attack to happen so she swiped the gem and came here to get things done."
-
- Cyrus: "But...?"
- Falicia: "But since the Archmage was killed in the battle, there was no one left with enough power to restore the Prince.
-
- "Iszara was terrified. Then one of our members, an Acolyte named Joto, decided he would try to help her find another way to restore the prince."
-
- Cyrus: "Did it work?"
- Falicia: "Yeah, Prince A'tor's behind you right now making funny faces. No, it didn't work.
-
- "Iszara was here night and day doing research with Joto, pouring over scrolls and spellbooks to find some clue that would help them.
- "But the Empire must have caught on. A Dark Elf came to talk to Jaganvir one day and the next thing you know Joto is thrown into the city jail for treason against the Empire."
-
- Cyrus: "What happened to Iszara?"
- Falicia: "I don't know if she got away or she was caught along with Joto or what. He's the only one who could tell you that and he's rotting away in a cell."
- Cyrus: "Not for long."
- Falicia: "You're crazy if you think you're going to break into the city jail! The Empire has--"
Archmage Jaganvir comes out of his study.
- Jaganvir: "Silence!"
- Falicia: "Archmage Jaganvir! I was only--"
- Jaganvir: "Would you have the Empire put the whole of the guild in chains? Speaking of this is strictly forbidden!"
- Cyrus: "Back off, sparkly, I was just leaving. I have everything I wanted to know."
- Jaganvir: "You're not leaving until I'm sure you'll never speak a word of what you've learned. And I have a perfect... and most satisfying... means of ensuring your discretion."
Jaganvir casts a spell, turning Cyrus into a gremlin. Cyrus runs out of the guildhall in gremlin form.
Joto's Story[edit]
This scene happens when you successfully ask Joto to change you back to human form.
- "What?! Oh. Joto sees. Jaganvir's favorite little trick. What did you do to annoy this Archmage, Joto wonders.
- Joto: "Well, Joto takes care of this, no problem. Tayn-soma-neah-oosh-m'ktal."
Cyrus is returned to his normal form.
- Joto: "There you are!"
- Cyrus: "Thank you. I'm Cyrus --"
- Joto: "Lords! Iszara's brother!"
- Cyrus: "Yes, yes, and I'm here because I'm told you can help me find Iszara."
- Joto: "Well. Yes. Like your sister, Cyrus knows where to find trouble. How did you get here? And can you get Joto out?"
- Cyrus: "Maybe. But keys are a problem. And I have a much better chance of getting out of here by myself."
- Joto: "Yes. Joto sees the problem."
- Cyrus: "But I swear I'll get you out of here if you'll help me find Iszara."
- Joto: "Yes. Joto thinks necromancer has Iszara."
- Cyrus: "How could that be?"
- Joto: "Iszara asked Joto for help, to use his magic to restore Prince A'tor from soul gem. Joto could not. And Joto knows no other at guild can help.
-
- "Joto knows only one sorceror [sic] can do this thing -- N'Gasta, powerful necromancer."
-
- Cyrus: "So you sent her there?"
- Joto: "No, no, no. Joto not stupid. Joto warned sister -- no trust dark worm N'Gasta. Powerful, yes, is N'Gasta -- but wicked. Soulstealer. Old and evil."
- Cyrus: "But Iszara would not listen."
- Joto: "No. She is your sister. You know. And she loves the Prince, so -- she must try. So Joto tells her -- Joto knows a precaution -- protection against wicked N'Gasta."
- Cyrus: "The precaution didn't work?"
- Joto: "No. Poor Iszara. No patience. Joto tells her -- Flask of Lillandril, old, old elven magic, here on this island --
-
- "But where? Flask is lost many, many years, so we search and search, but -- few clues, so slow, Iszara can't wait.
- "We find one thing, one piece of map, I think it shows where to look, but just one piece --"
-
- Cyrus: "So she abandoned any hopes of finding the flask and went to the necromancer's anyway --"
- Joto: "Yes, I think. But Joto keeps looking, and Joto finds other piece of map.
-
- "But before Joto can show it, Iszara is gone. Then Imperials they find Joto and stick him here.
- "But -- Joto still has map piece. He hides it from guards. Here. I show you --"
-
Dram appears at the end of the hallway as Joto gives Cyrus the map piece.
- Joto: "Take this, find flask. Then go to N'Gasta, find Iszara there, I think --"
- Dram: "You talk too much, cat."
Dram fires an arrow at Joto.
- Joto: "Aggh!"
- Cyrus: "Joto!"
- Joto: "Find -- Iszara"
- Dram: "Redguard. One way out. Through me."
- Cyrus: "Bastard. You -- bastard!"
Unused Dialogue[edit]
Probably a missing line after Joto says, "Joto finds other piece of map".
- Joto: "Genuine, Joto is sure, but unenlightening."
Two lines from Cyrus that don't fit well within the overall structure:
- Cyrus: "We don't have much time before they come looking for you."
- Cyrus: "First you have to tell me what you know of my sister. I fear she's in great danger."
| Prev: Contact the League | Up: Quests | Next: Rescue Iszara |
